The Blackgang Garden Railway
Introduction
 There's a wonderful play written by Arnold Ridley (Godfrey from Dad's Army), later also turned into a film, called The Ghost Train.
The story is about a disused railway line in remote countryside that was used for gun running. In order to keep prying eyes away, the gang told a story locally
that a ghost train sometimes used the line at the dead of night and terrible things would happen to anyone who set eyes on this
ghostly train.
There's a wonderful play written by Arnold Ridley (Godfrey from Dad's Army), later also turned into a film, called The Ghost Train.
The story is about a disused railway line in remote countryside that was used for gun running. In order to keep prying eyes away, the gang told a story locally
that a ghost train sometimes used the line at the dead of night and terrible things would happen to anyone who set eyes on this
ghostly train.
Well it's a great story and it occurred to me that a similar line might once have existed between Blackgang and Shanklin on the Isle of Wight. Blackgang is not famous for gun running to my knowledge but it does have a history of smuggling. A railway line from Blackgang linking with the main line at Shanklin might well have once existed. Either way, I thought a mythical railway through the Isle of Wight used by smugglers running 'ghost trains' would be a good theme for a garden railway. The railway could be both spooky at Halloween and floodlit like the Blackgang Chine theme park that not rests on the cliffs where the smugglers' once landed their cargoes.
Planning the railway
 Unfortunately I don't have an especially large garden and the garden is on two levels effectively limiting my
options for the railway to half the garden. I decided to use 5" track, the smallest gauge suitable for passengers. There's no space for a loop so I was restricted to a single point to point line. In order to keep the short line as interesting as possible
I planned the track to have a few gentle curves with bushes and vegetation blocking the direct line of sight between the two ends at track level. This has worked to give the appearance of a
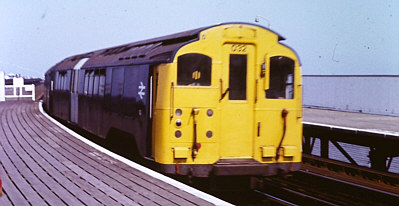
far longer track than it actually is. My original intention was to acquire a model of the old London Underground Standard Stock (also known as classes 485 and 486) built in the 1920s that
were used on the Isle of Wight's Ryde to Shanklin line following electrification in 1967 and can be seen here at Ryde Esplanade on a sunny August day in 1979. Getting detailed plans proved quite difficult so this idea was put on hold when an alternative
came to light; however the idea of a model of this lovely old train is still active in my mind and I still intend to implement it at some point.
Unfortunately I don't have an especially large garden and the garden is on two levels effectively limiting my
options for the railway to half the garden. I decided to use 5" track, the smallest gauge suitable for passengers. There's no space for a loop so I was restricted to a single point to point line. In order to keep the short line as interesting as possible
I planned the track to have a few gentle curves with bushes and vegetation blocking the direct line of sight between the two ends at track level. This has worked to give the appearance of a
far longer track than it actually is. My original intention was to acquire a model of the old London Underground Standard Stock (also known as classes 485 and 486) built in the 1920s that
were used on the Isle of Wight's Ryde to Shanklin line following electrification in 1967 and can be seen here at Ryde Esplanade on a sunny August day in 1979. Getting detailed plans proved quite difficult so this idea was put on hold when an alternative
came to light; however the idea of a model of this lovely old train is still active in my mind and I still intend to implement it at some point.
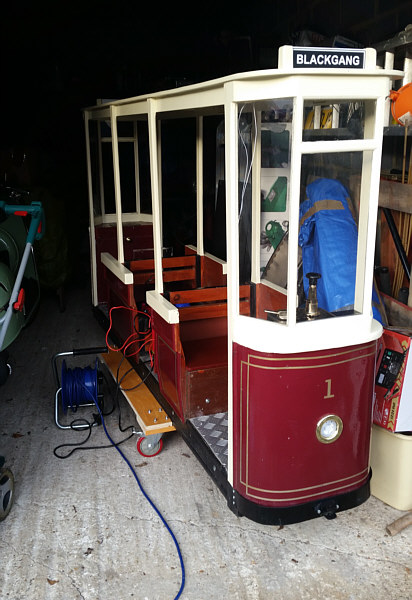
 What happened to change my mind was that I found an old wooden tram for sale at Station Road Steam. I assume they had probably bought it for part exchange for one of their new engines.
The running gear and electrics were not operational and it looked like a colony of spiders had probably taken residence but someone had put a lot of effort into the tram itself and as it was a non-runner, the price was very reasonable.
What happened to change my mind was that I found an old wooden tram for sale at Station Road Steam. I assume they had probably bought it for part exchange for one of their new engines.
The running gear and electrics were not operational and it looked like a colony of spiders had probably taken residence but someone had put a lot of effort into the tram itself and as it was a non-runner, the price was very reasonable.
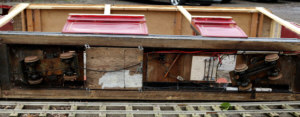
 The photo showing
to the left showing the tram on its side was provided by the seller and showed the poor condition on the running gear as offered for sale.
I was in discussions at the time with the owner of Ride on Railways at the time (discussing the build of the class 485) and he suggested the tram could be fitted
with his electrics and running gear which included re-generative braking. And that is what happened. As it turned out there was additional work to do; the tram's woodwork had wood worm and this had to be treated. The team at Ride on Railways did a wonderful job with some fine detailing
and even the addition of a pantograph! There are photographs of this work on the Ride on Railways facebook page. The renovated tram looks great on the railway (as you will in the photographs below)and was delivered in October 2016.
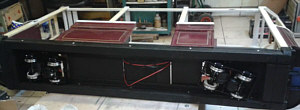
The photo to the right shows the base of the tram in the workshop after renovation (thanks to Ride on Railways for this photo).
The photo showing
to the left showing the tram on its side was provided by the seller and showed the poor condition on the running gear as offered for sale.
I was in discussions at the time with the owner of Ride on Railways at the time (discussing the build of the class 485) and he suggested the tram could be fitted
with his electrics and running gear which included re-generative braking. And that is what happened. As it turned out there was additional work to do; the tram's woodwork had wood worm and this had to be treated. The team at Ride on Railways did a wonderful job with some fine detailing
and even the addition of a pantograph! There are photographs of this work on the Ride on Railways facebook page. The renovated tram looks great on the railway (as you will in the photographs below)and was delivered in October 2016.
The photo to the right shows the base of the tram in the workshop after renovation (thanks to Ride on Railways for this photo).
The photos below show how the tram looks on the track - stunning! however because of its weight it is very difficult to lift to the raised track from winter storage and vice versa; it would be relatively easy if the railway had been at the same level as the storage. For this reason it really will have to be temporary and I intend to sell it at some point and replace it with lighter stock, eventually the ex London Transport tube train as originally intended!
Designing the layout and building the track
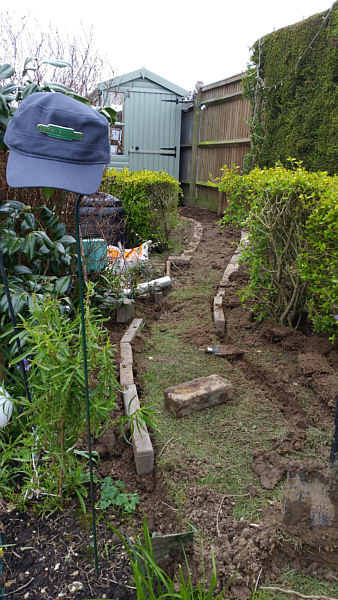
 Having decided the route, I now needed to find track work, signals, ballast and lots of other related infrastructure.
Plans were developed in March 2016 and the construction of the 'permanent way' was began in April 2016; it required the
removal of three Leylandii trees, digging up and replanting several bushes and shrubs as well as levelling the track bed. The track bed also needed digging down several inches, lining
to avoid weed growth and finally laying a suitable ballast. The route of the track also crossed several low voltage cables that supplied power to existing garden lighting and my weather station.
I had to be careful while digging to avoid damage to these (as well as avoiding damage to the roots of trees and shrubs close by).
I took the opportunity to replace some of the wiring (running it under the tracks) and provided aluminum culverts in several location
to allow cables to be easily run under the track work. I also laid new wires for several signal lamps.
Having decided the route, I now needed to find track work, signals, ballast and lots of other related infrastructure.
Plans were developed in March 2016 and the construction of the 'permanent way' was began in April 2016; it required the
removal of three Leylandii trees, digging up and replanting several bushes and shrubs as well as levelling the track bed. The track bed also needed digging down several inches, lining
to avoid weed growth and finally laying a suitable ballast. The route of the track also crossed several low voltage cables that supplied power to existing garden lighting and my weather station.
I had to be careful while digging to avoid damage to these (as well as avoiding damage to the roots of trees and shrubs close by).
I took the opportunity to replace some of the wiring (running it under the tracks) and provided aluminum culverts in several location
to allow cables to be easily run under the track work. I also laid new wires for several signal lamps.
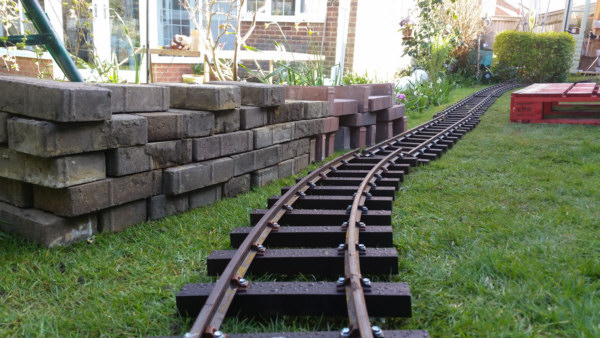
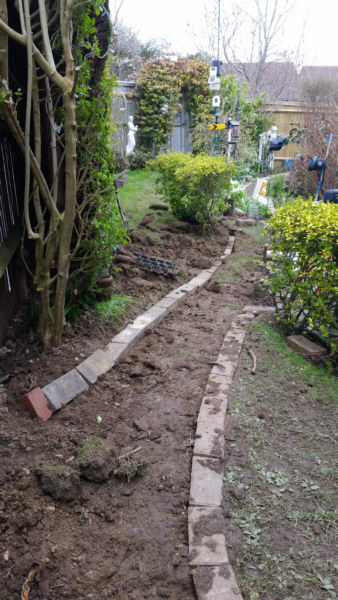
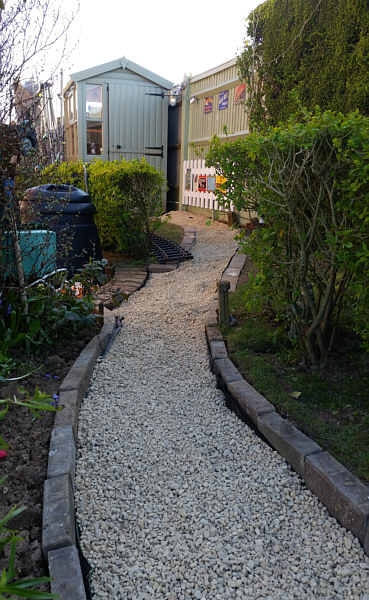
 There are many options for track work and sleepers. The track can be aluminum or steel. Both have advantages and
disadvantages relating to realism, wear, weight, risk of theft and cost. I opted in the end for steel track as this would weather (rust) like
real railways. Aluminium stays bright. Tarnished aluminium can also damage the wheels. Having decided on the track type a detailed (and accurate) survey needed to be done.
Accuracy was important as the garden was small and the planned route was close to existing brick work and other garden features; any error in the plans would
lead to the track not fitting the garden when delivered. I worked out the lengths and curves required. Curves are specified as a radius in feet.
The track components were purchased from The Miniature Railway Supply Company; they also supplied the signals, lever frame, buffer, level crossing road sign and other trackside features.
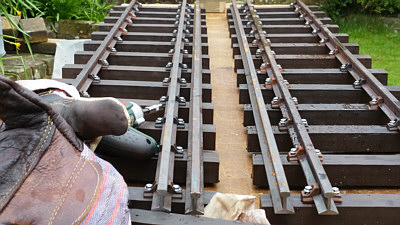
The track needed to be constructed from the components (right). The sleepers are actually recycled plastic but look quite convincing. I used 25 large bags of stone chips for ballast and over 100 bricks; the bricks were used to make a tidy border between the lawn
and flower beds - they also have the advantage of helping to keep earth from the flower beds and worm casts etc. from the lawns getting onto the ballast. This keeps it
looking good but also minimises the risk of weeds and grass growing along the track. I constructed some of the trackside signs and furniture myself (as well as painting some
purchased. There's a fantastic book, Southern Nouveau and the Lineside which proved invaluable; in addition to providing hundreds of
detailed drawings, it also provided accurate paint colours of all aspects of southern region's corporate colour scheme.
There are many options for track work and sleepers. The track can be aluminum or steel. Both have advantages and
disadvantages relating to realism, wear, weight, risk of theft and cost. I opted in the end for steel track as this would weather (rust) like
real railways. Aluminium stays bright. Tarnished aluminium can also damage the wheels. Having decided on the track type a detailed (and accurate) survey needed to be done.
Accuracy was important as the garden was small and the planned route was close to existing brick work and other garden features; any error in the plans would
lead to the track not fitting the garden when delivered. I worked out the lengths and curves required. Curves are specified as a radius in feet.
The track components were purchased from The Miniature Railway Supply Company; they also supplied the signals, lever frame, buffer, level crossing road sign and other trackside features.
The track needed to be constructed from the components (right). The sleepers are actually recycled plastic but look quite convincing. I used 25 large bags of stone chips for ballast and over 100 bricks; the bricks were used to make a tidy border between the lawn
and flower beds - they also have the advantage of helping to keep earth from the flower beds and worm casts etc. from the lawns getting onto the ballast. This keeps it
looking good but also minimises the risk of weeds and grass growing along the track. I constructed some of the trackside signs and furniture myself (as well as painting some
purchased. There's a fantastic book, Southern Nouveau and the Lineside which proved invaluable; in addition to providing hundreds of
detailed drawings, it also provided accurate paint colours of all aspects of southern region's corporate colour scheme.
Rolling stock
Click on the galleries below for photos of the line's rolling stock. The main photo gallery below (continue to scroll down) shows the railway line including additional views of all the rolling stock.
 |
 |
 |
 |
Main photo gallery
The rest of this page shows pictures of the railway and its rolling stock. There is a section towards the end of the page showing images of the construction stage. The captions may be useful especially to anyone considering building their own garden railway; they are not intended as a full 'how to' guide but will describe some of the issues encountered and how they were overcome.
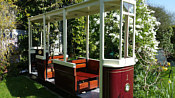
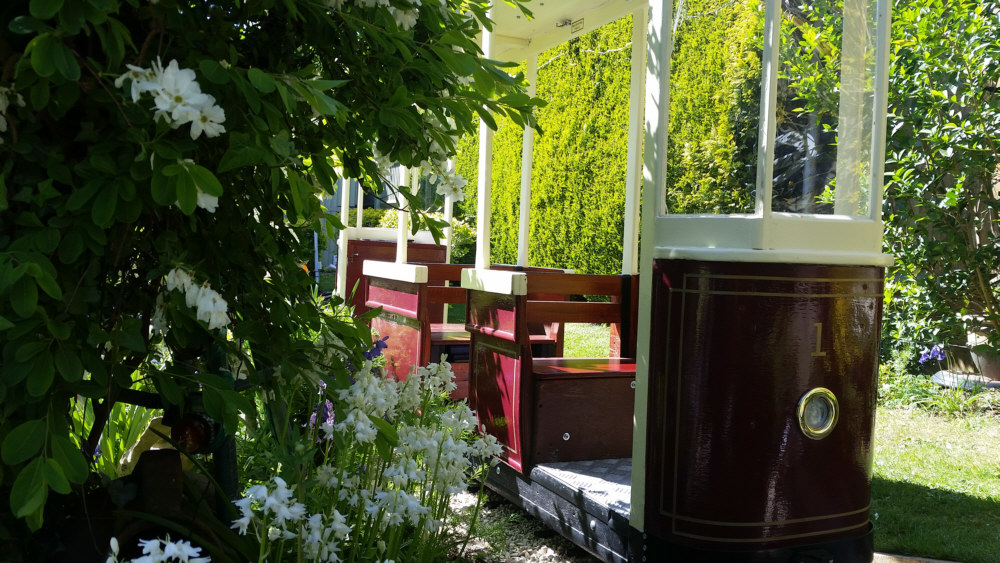
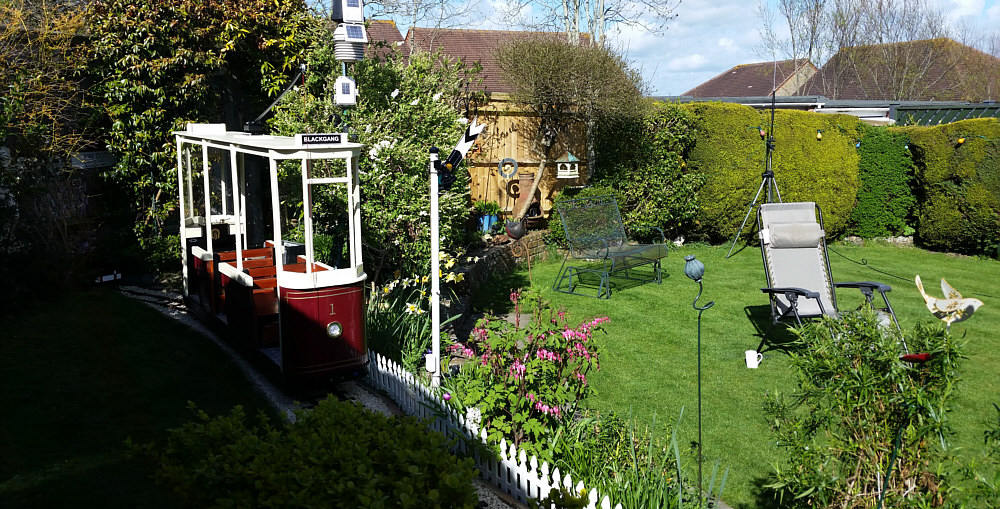
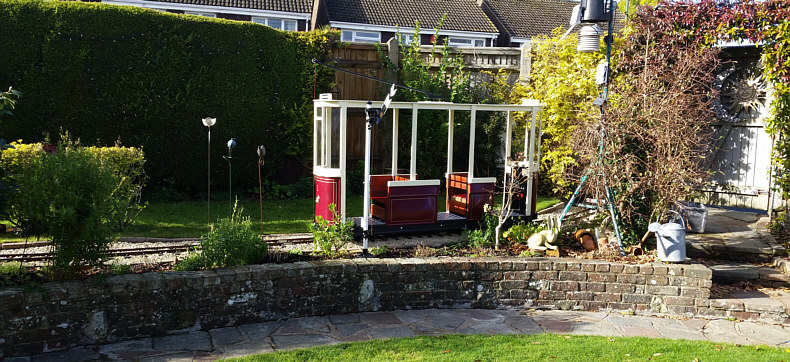
A beautiful spring day in 2017. The tram was delivered in October 2016 but spent the winter in storage safe from the weather so this would have been taken soon after it began in service.
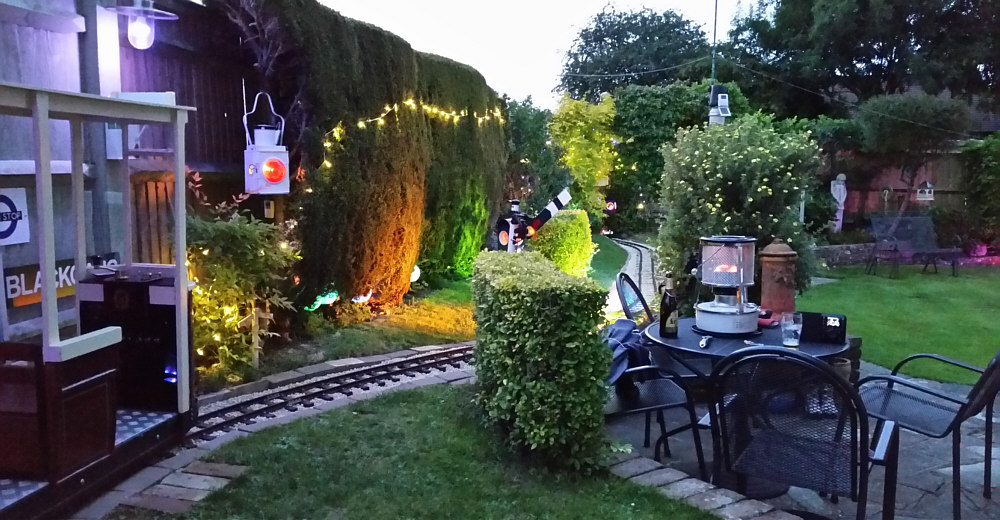
The garden railway (or garden tramway as it has become for now) is best enjoyed in the evening. I have restored several old road lamps and purchased a few paraffin railway lamps which add to the ambiance on a summer's evening. The paraffin heater takes the chill off, is more economical than outdoor gas heaters but I'd not recommend when children are around.
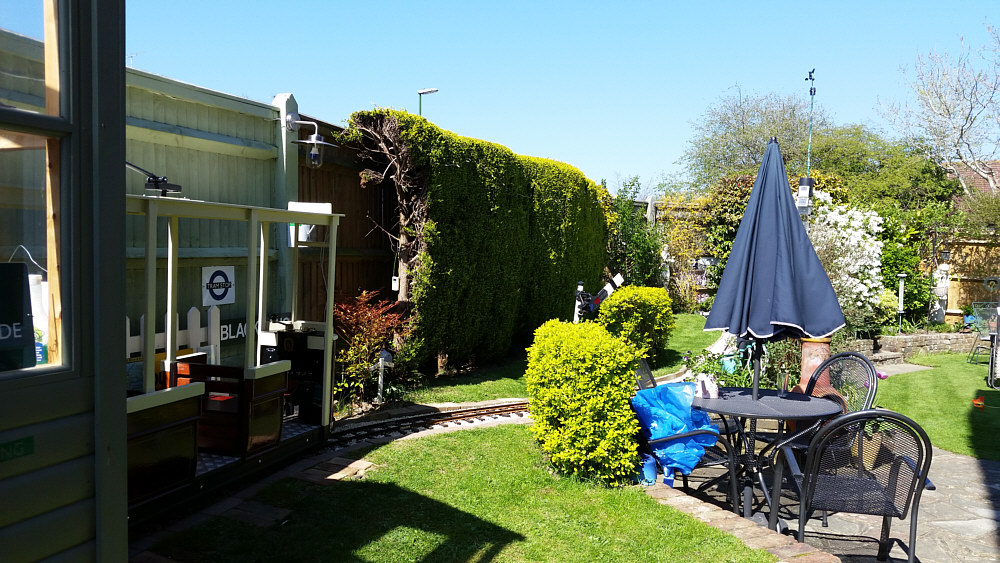
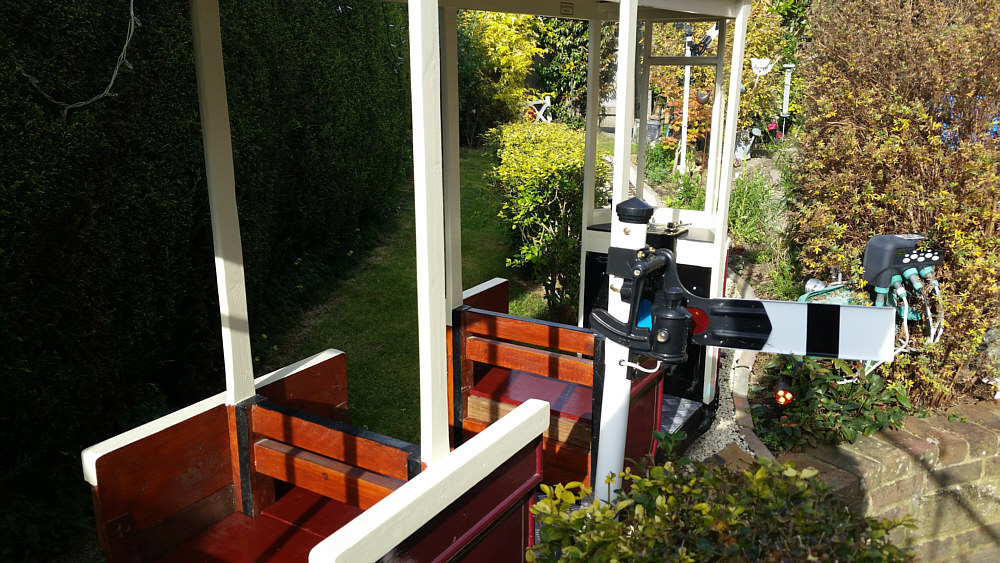
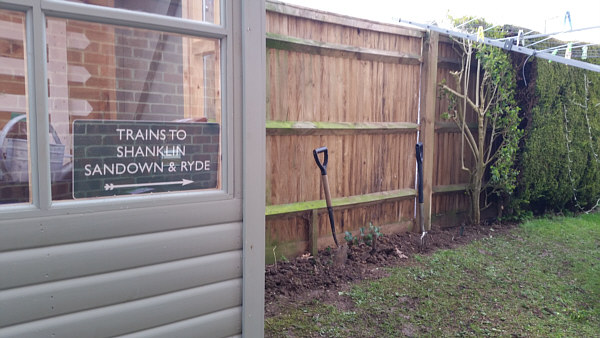
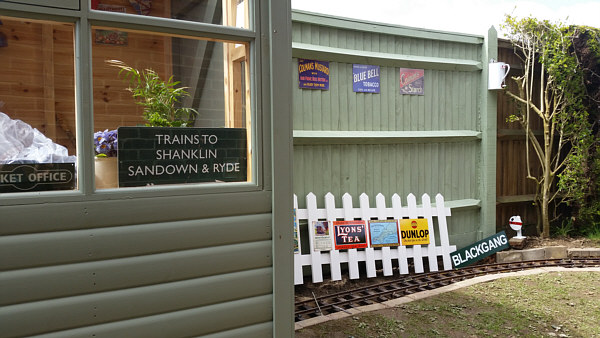
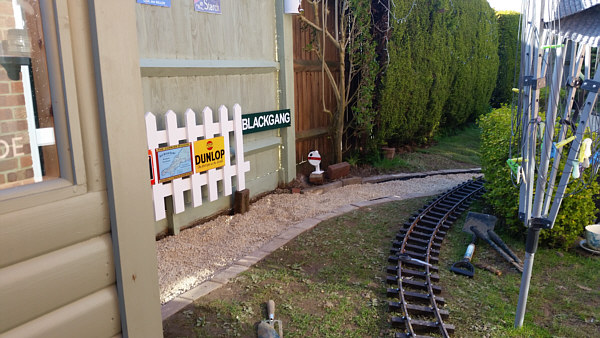
The potting shed was my wife's idea. To me it looked like a signal box and inspired the idea for the garden tramway!
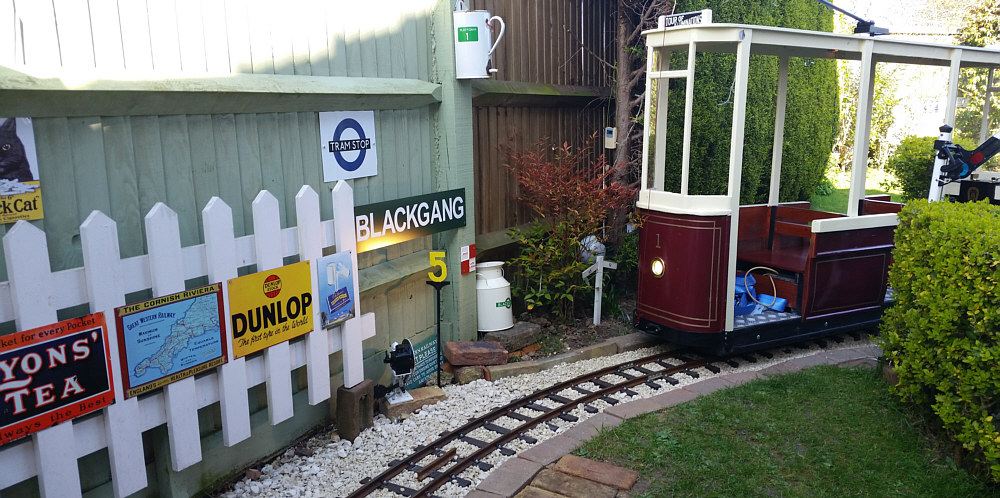
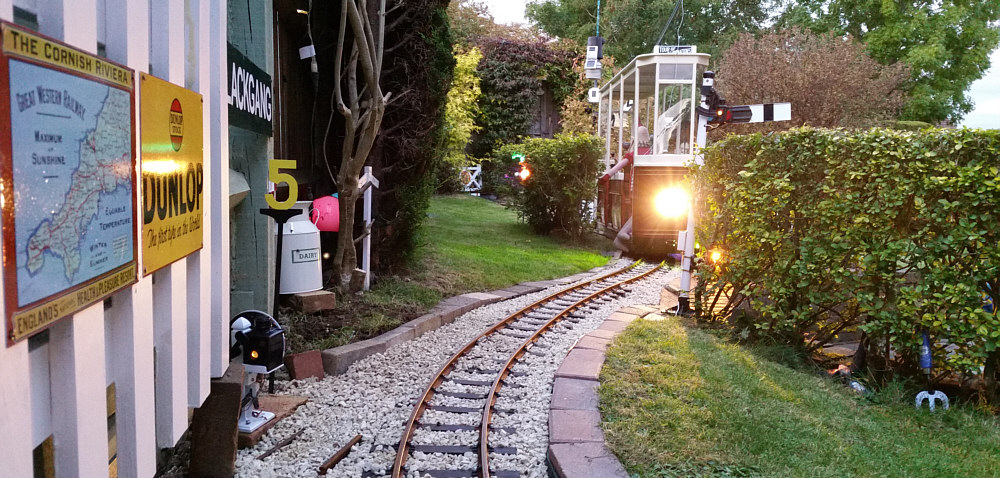
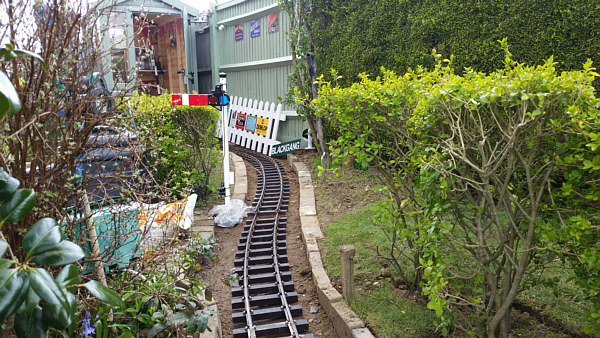
The tram approaching Blackgang station with its running light on. There is no option to drive it from this end so the driver was at the 'front'. I perhaps spoiled this shot a bit with items of junk cluttering the passenger area! The raw gap left by removing a Leylandii tree is shown here. The shrub shown here replaced the small tree I moved here (see the photos of the construction below). Sadly the small tree didn't take root in it's new position so I purchesed this to fill the gap. It was freshly planted in this view but has taken well and is now twice the height shown here.

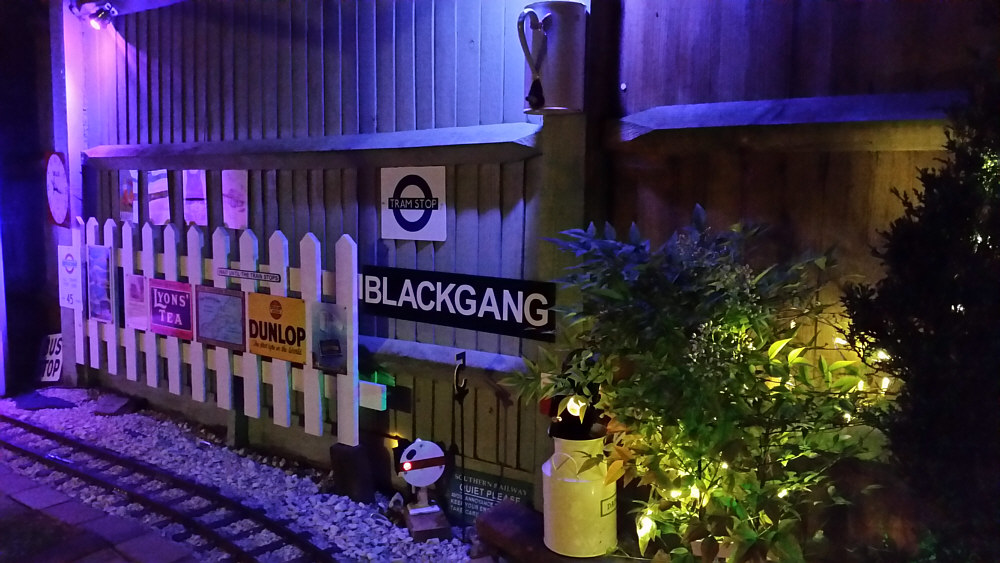
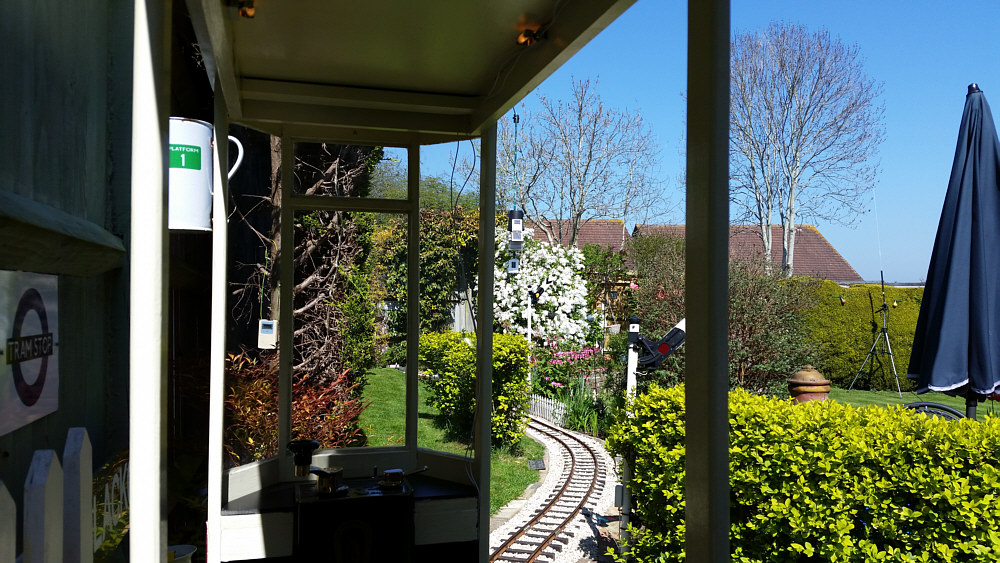
A view towards the end of the line, this time in early spring. Note the replica London Transport tram sign and 'way out' signs on the fence. I made these myself using a vinyl cutter. There's an interesting detail in this photograph; the sun is shining through the lens on the distant signal leaving a light blue colour to a patch on the cream window frame above the number '1'. What's interesting is that old signal's always used a blue lens becuase a paraffin flame was yellow - the yellow through the blue lens shows as green as expected (except when the sun shines through)!
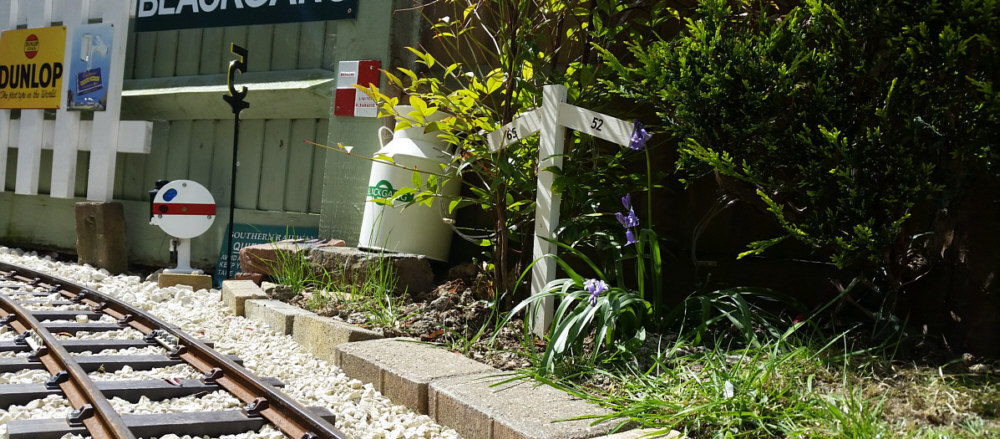
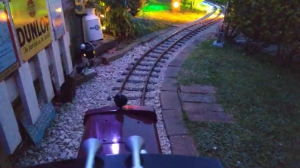
A view of the trackwork just outside Blackgang station. The shunting signal (purchased from the Miniature Railway Supply Company (see the resources section below for details) is lit with a small bulb. For realism, the bulb is yellowy-orange to simulate the colour of burning paraffin; the coloured lens glass can be either red or blue depending whether the signal is on or off (as in real life). The yellow light makes the blue lens look green! The gradient boards along the track are accurate. I tried to keep the line as level as possible but some gradients were inevitable. To measure the gradient I used a free app for my Android phone, details below in the resources section.
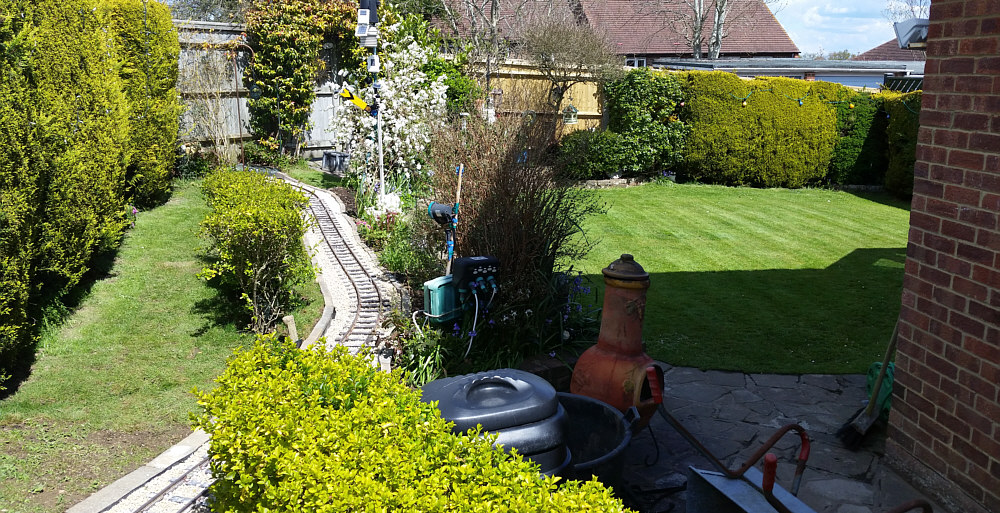
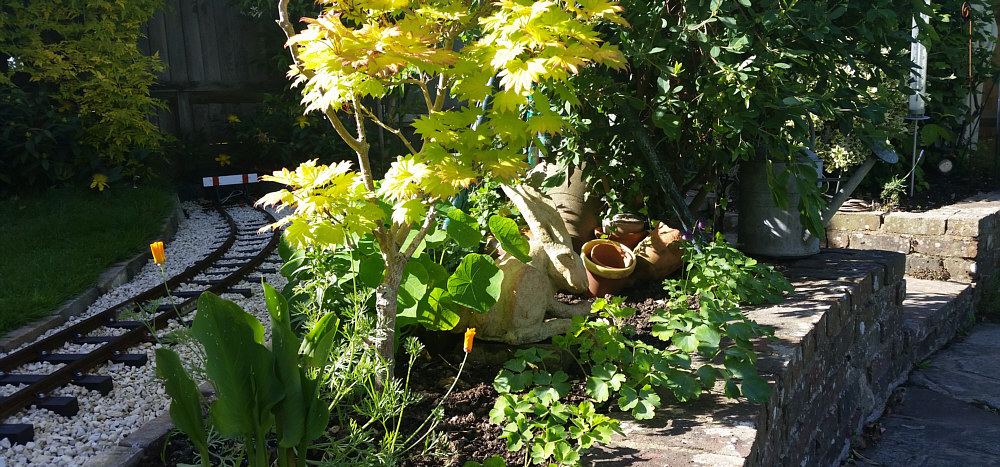
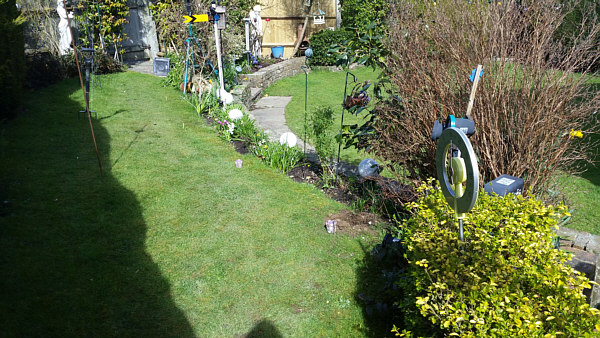
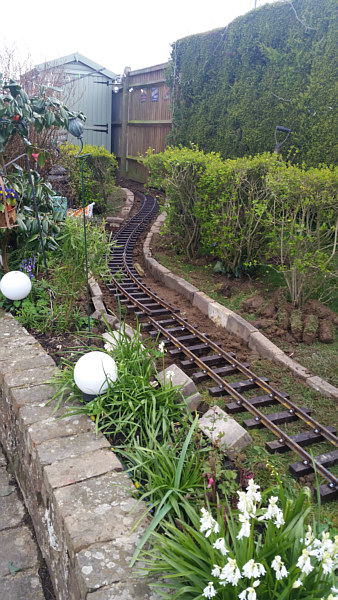
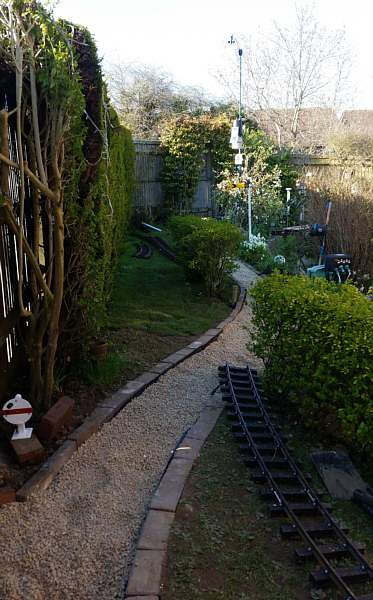
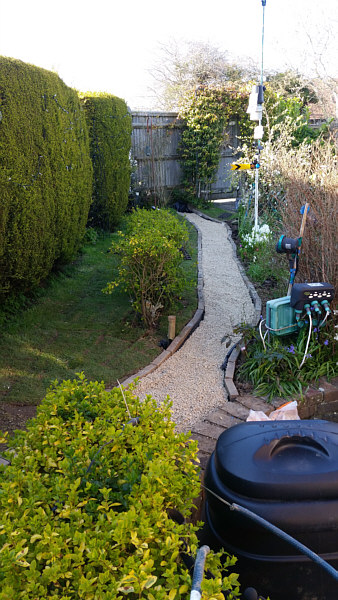
A spring view of part of the line. I said in my introduction that I don't have an especially large garden. The garden is made to look bigger by the careful use of plants and the two-levels (the railway is on a ledge two feet or so above the lawn. Mowed grass, especially with lines from a mower's roller also makes the garden look far bigger. That may sound daft but it's true!
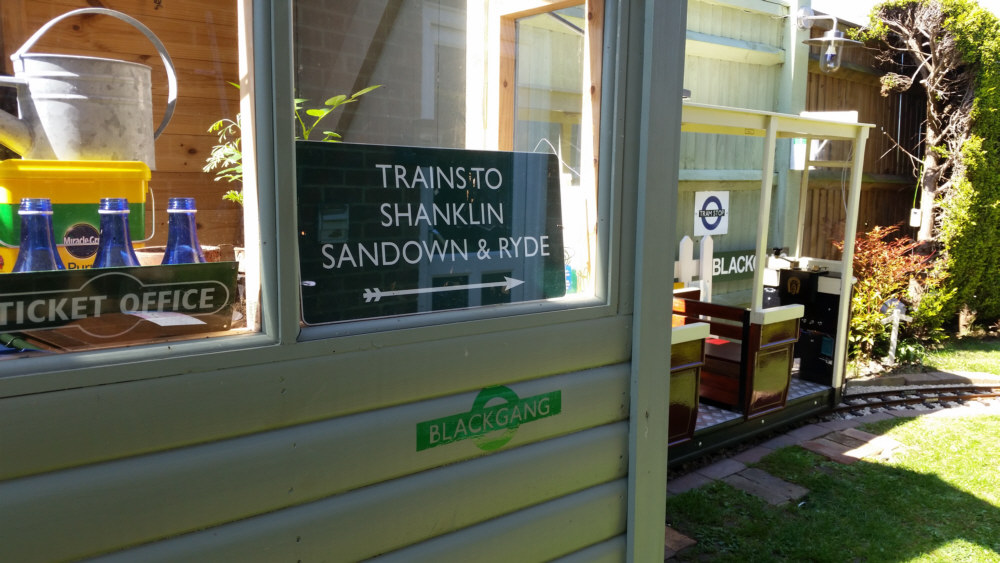
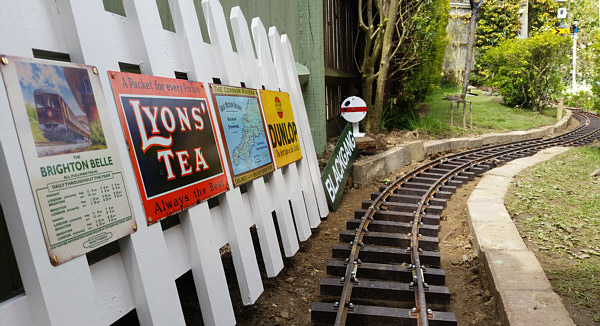
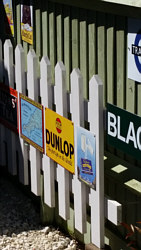
A daytime view of the tram approaching Blackgang station. This view shows the enamel signs (from Amazon, Ebay etc.) the 5 mph sign (painted authentically with yellow to the front and black at the rear as specified by the old Southern Region, as described in the book Southern Nouveau and the Line side. The track incidentally is 5 inch scale (or gauge), the smallest suitable for carrying passengers.
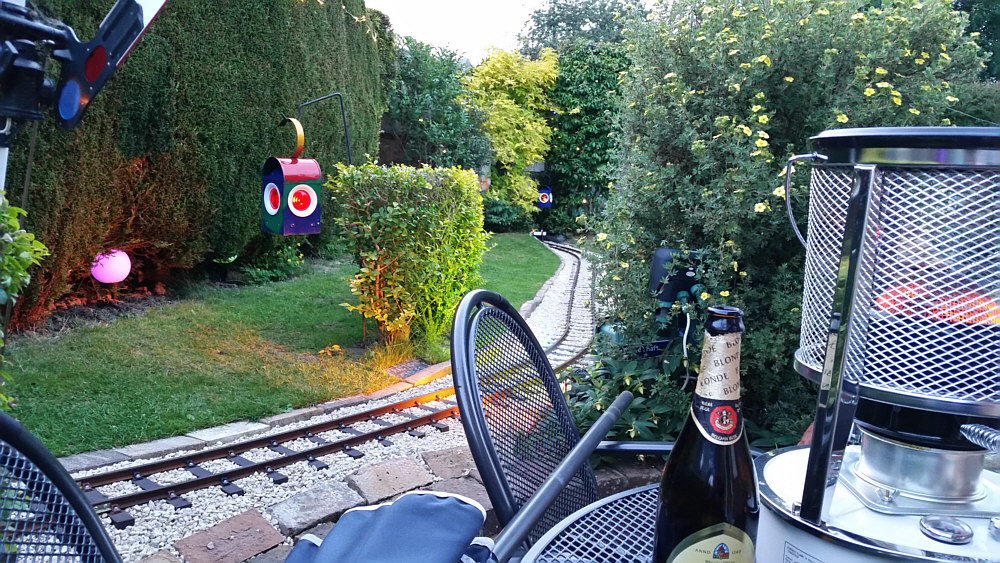
A late evening view showing the saloon lighting, some paraffin lamps and LED garden lighting..
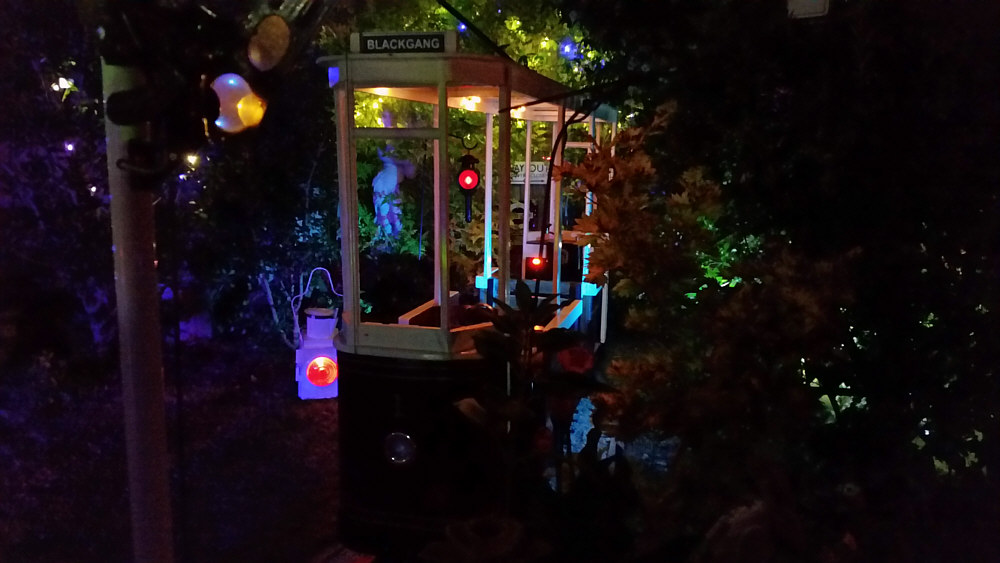
Late evening at Blackgang with a tram due in. The shunt signal is lit in this view.
Another spring morning. There are bluebells along the line and I did think of calling the railway "The Bluebell Line" but I thought that didn't sound very original!
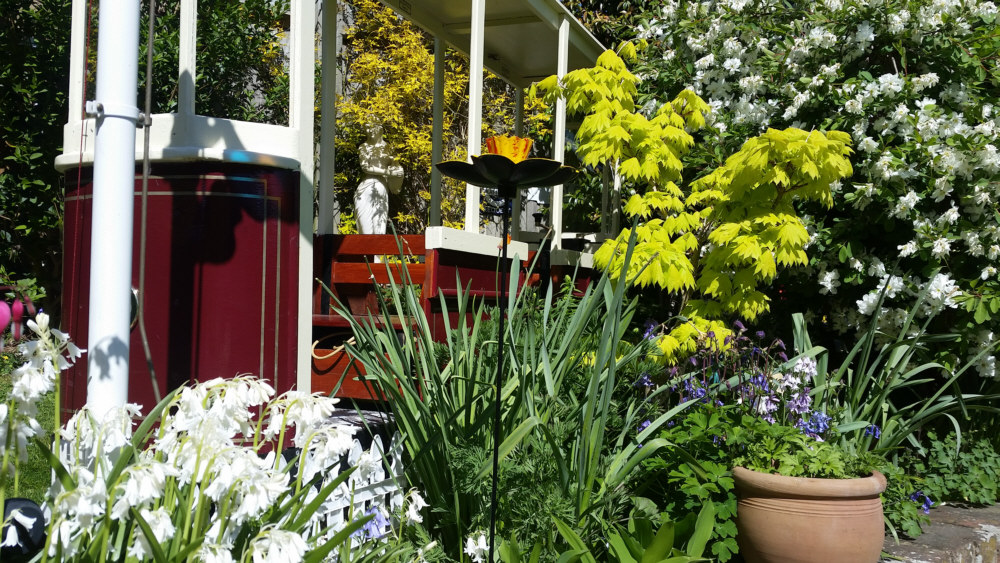
More spring flowers.
The tram looks a picture in this view taken at the end of May 2017.
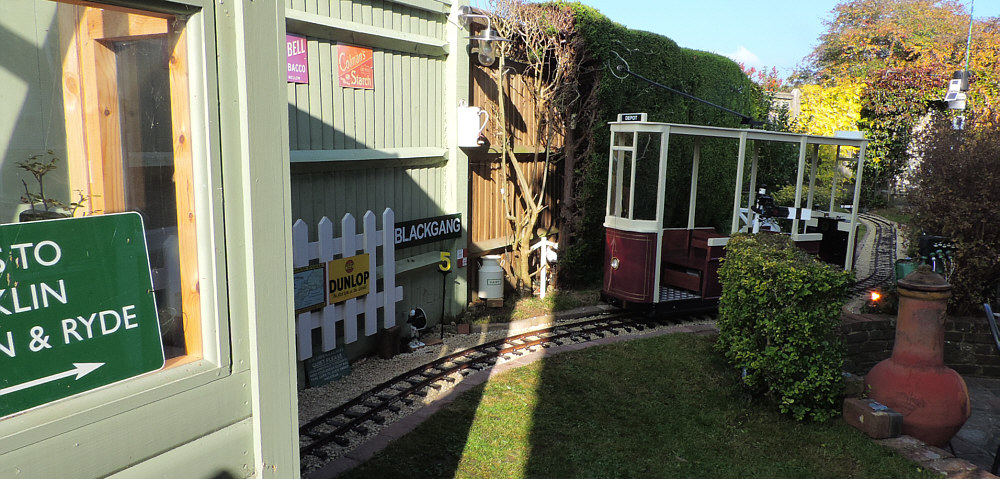
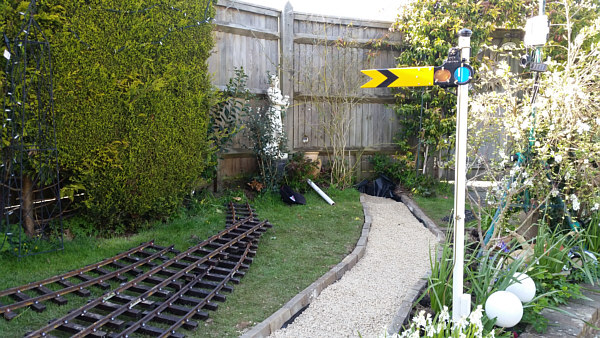
Early evening tram held by the 'home' signal outside the station. Note the crossing gate at the end of the garden. I haven't yet worked out the best place for this.
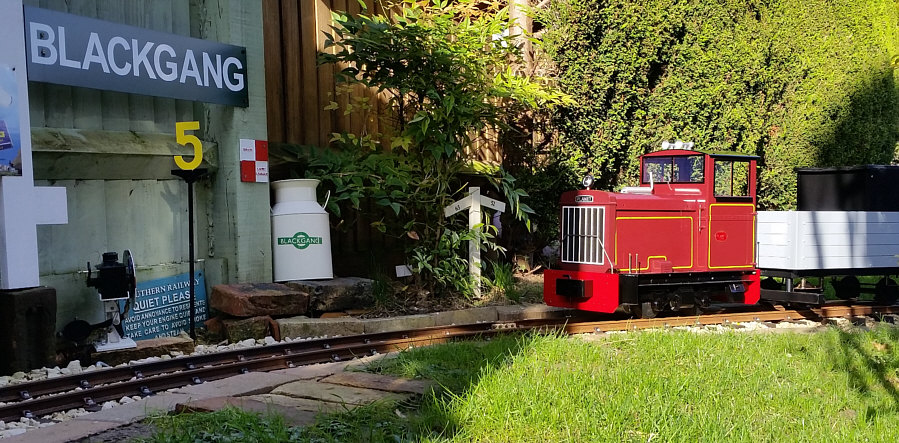
The shunter 'Sandrock' waits outside Blackgang station.
An early spring view of the trackwork. This shot was from 2016, soon after the track was laid and before there was any rolling stock!
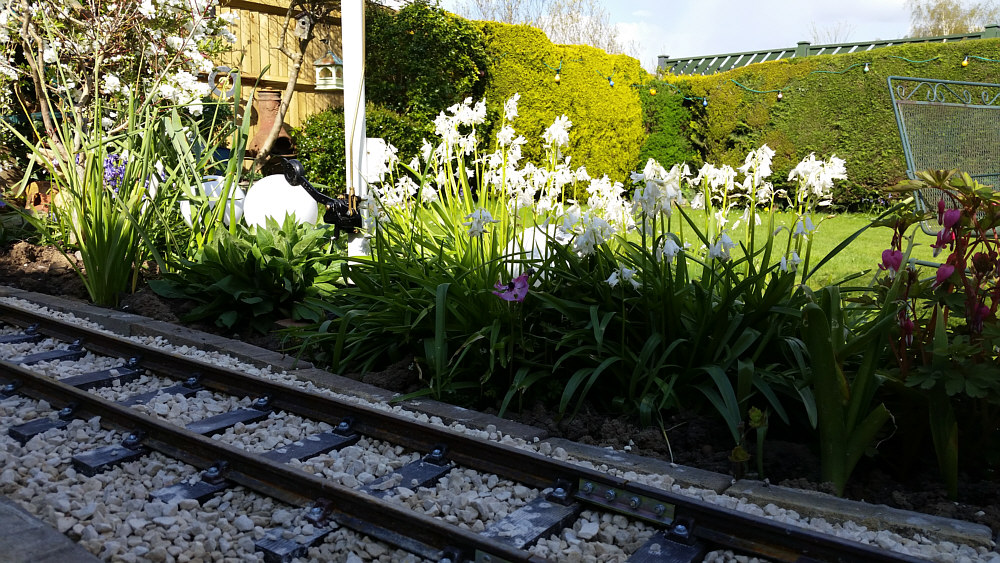
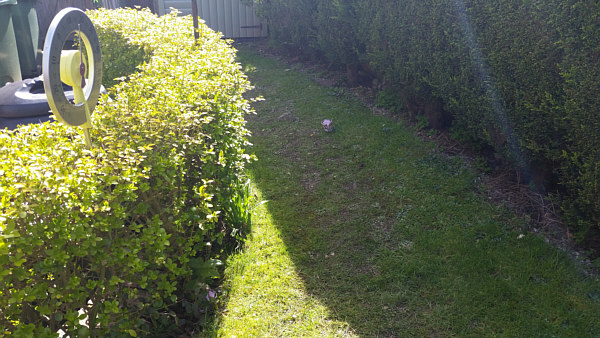
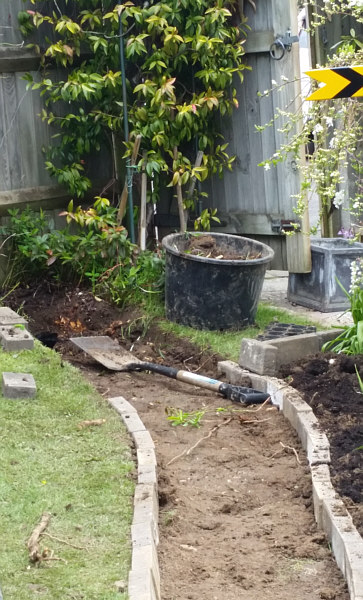
A section of track runs alongside the flower border, seen here awash with bluebells. The line of bricks helps keep the soil on the garden and the ballast on the railway. In later shots I've added a small fence here. The white globe lights seen here (or at least their cables) made gardening difficult so part of the deal with my wife was to re-locate them (something I did soon after this photo was taken). In fact the new cables were laid (together with others supplying power for the signal lights) under the track.
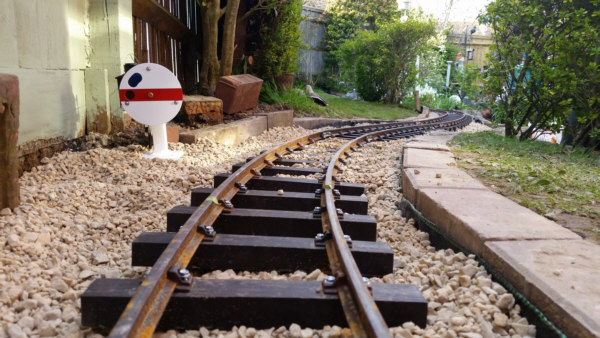
A view of the end buffer stop in summer. The buffer was purchased as an unpainted kit from MRSC (see the resources section below for details).
Another lineside view, this time with the plastic picket fence helping to keep the soil (and plants) from encroaching on the line!
This view from the lawn shows the brick wall dividing the garden into two levels. The tram needs lifting up this wall when being moved from storage. Space is limited which makes this a difficult task even with three fit adults! The photo also shows how the line has blended in with the garden and not taken over. The 'distant' signal and level crossing gate (still not in it's fixed position) can be seen in this shot.
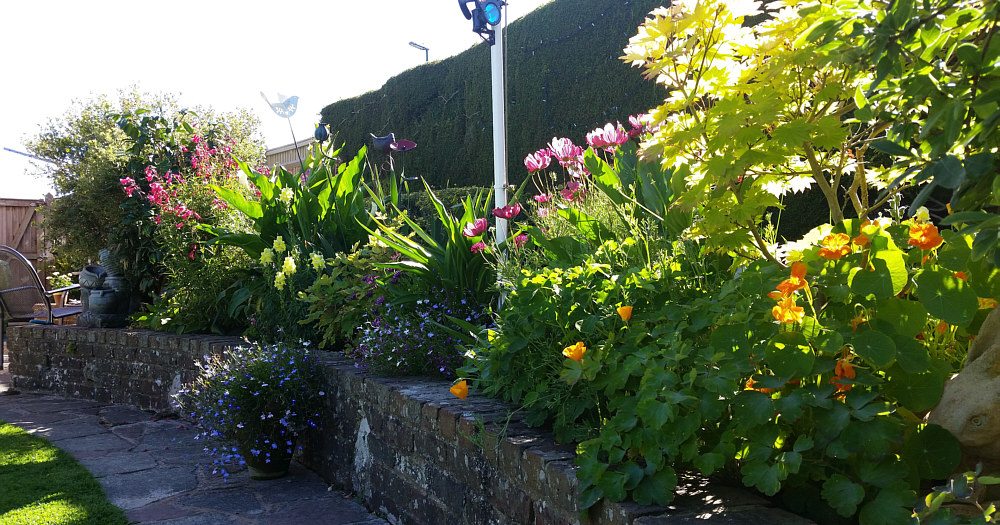
The flower border running beside the track.
A view inside the tram showing one passenger compartment and the driver's 'cab'..
The tram waiting to depart Blackgang. The tram controller can be seen in this view.
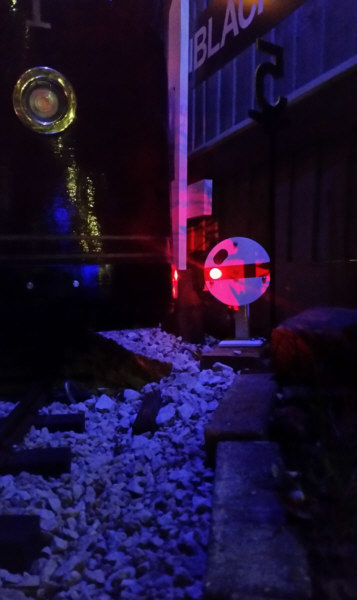
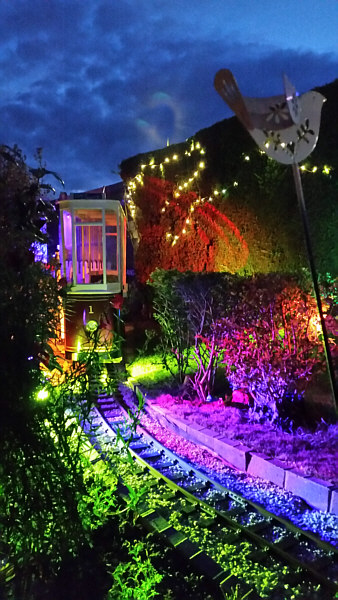
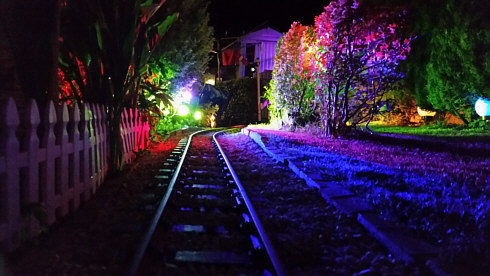
Two more night views, the one on the left with a definite ghostly look. The photo on the right shows the garden flood lighting inspired by the theme park at Blackgang Chine in the days when it opened until 10pm most evenings. I believe the park intends opening floodlit in evenings this Autumn (2018).
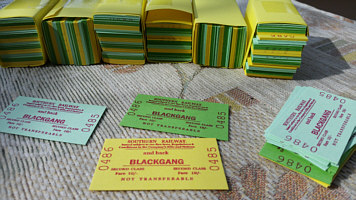
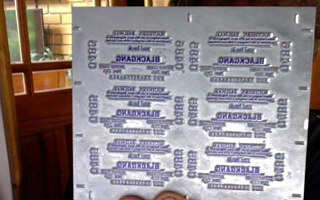
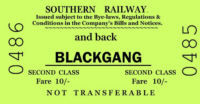
Of course no railway would be complete without tickets! Mine were printed using traditional techniques from the printing plate (right) by the print shop at Amberley Museum in West Sussex. The museum's official website is linked from the resources section below.
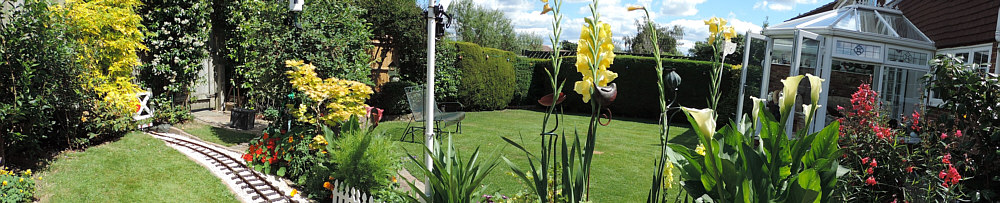
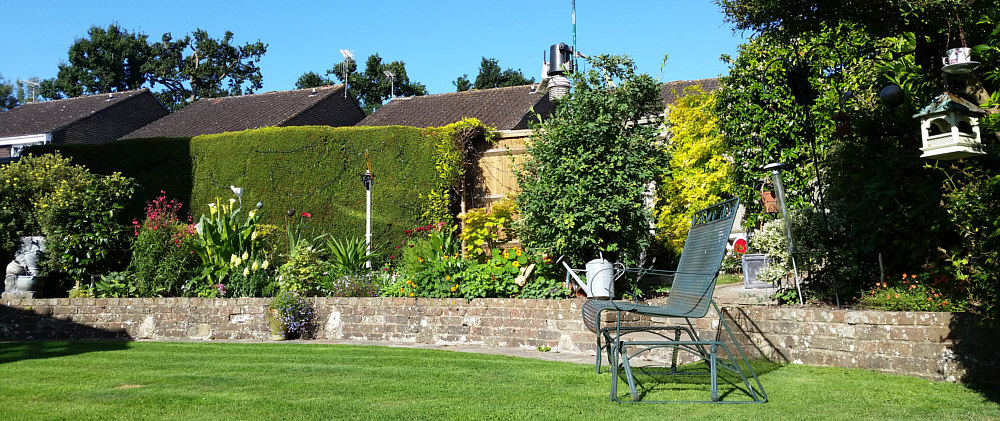
Panorama view of the garden with the line in the foreground.
In this Autumn view the raised section of garden is evident.

A view of the line after a light sprinkling of snow.
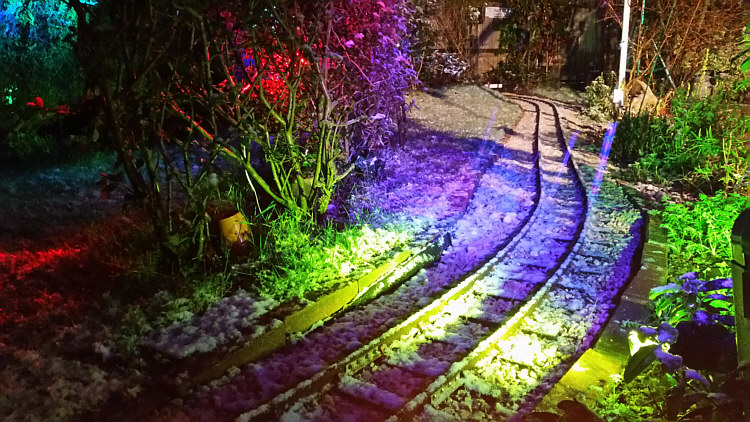
Another mid-winter view
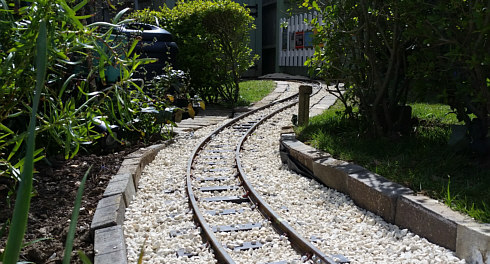
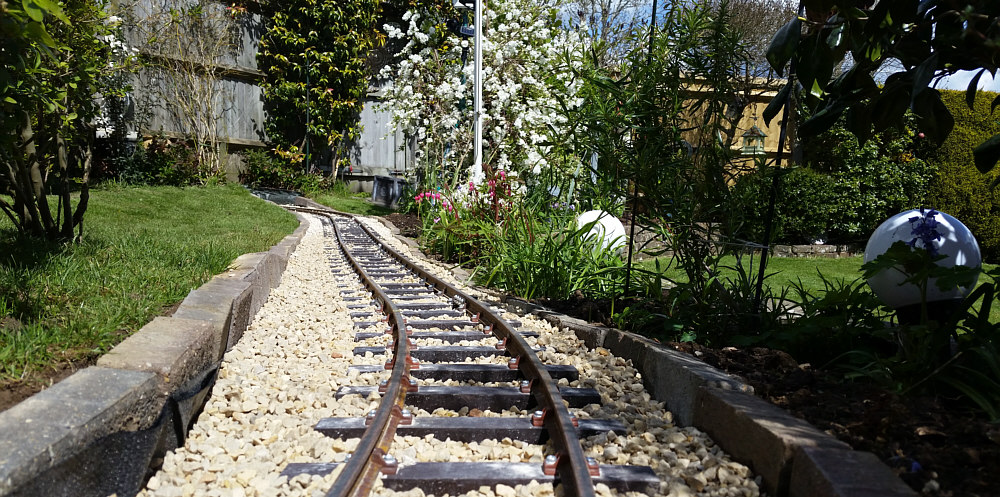
Two more views from a low angle - the track looks very realistic having weathered. I was also careful to select the appropriate size of stone for the ballast to keep the correct scale ratio with the track.
There are more pictures of the Blackgang Garden Railway here.
Video (YouTube)
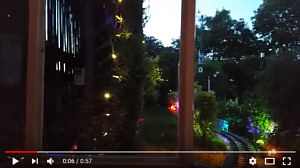
Evening tram cab ride
Evening shunter ride
Photo gallery - construction
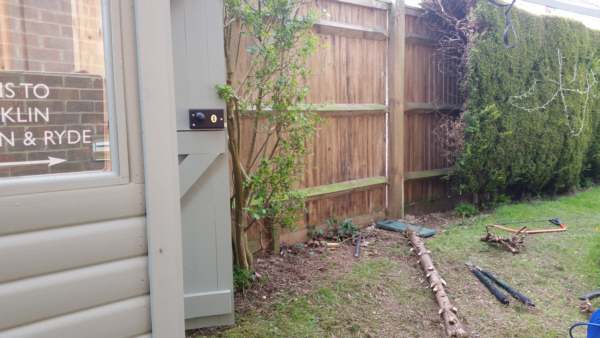
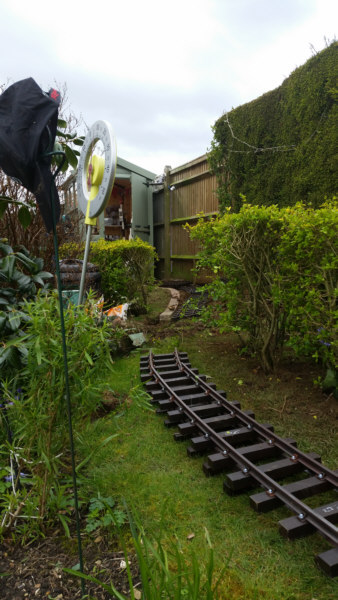
Not an especially good photo but the Leylandii trees can be seen along the line of the fence up to the potting shed.
Having removed the Leylandii (and their extensive root system) the large shrub near the potting shed (left) was moved to near the remaining Leylandii tree line (right) - I did this because having removed the trees, there was a large area of no growth to the side of the remaining hedge. In the event this shrub didn't survive re-planting, largely because the track constrained the area where roots could grow. I now have a more attractive shrub in this position.
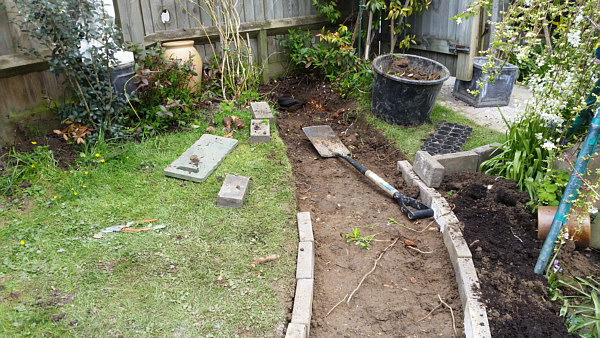
The garden before construction of the railway (other than the 'distant' signal).
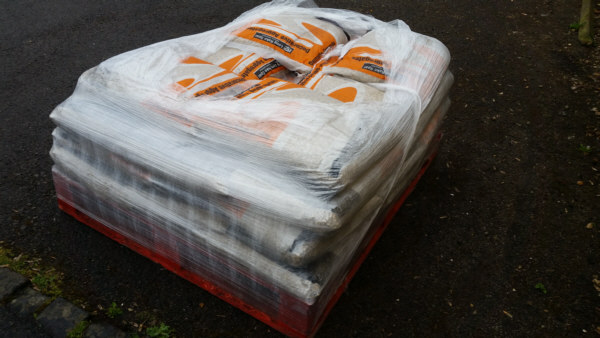
A palette of stone chippings for ballast. From memory there were 24 large sacks!
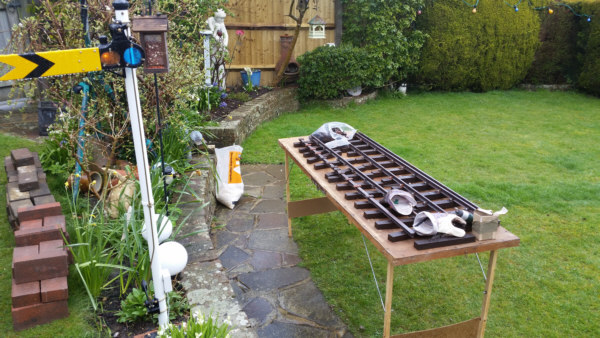
A wallpaper pasting table was ideal for the construction of the trackwork. Each sleeper needed aligning and bolting to the fish plates. Each 6 foot section took about an hour. There's a pile of bricks to the left that will form the barrier between the track and garden.
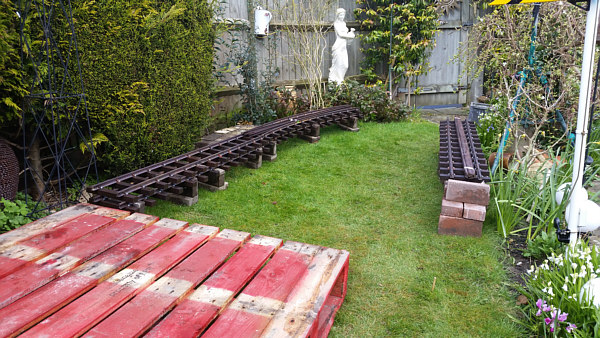
The palette that was used to deliver the ballast. It's scale is better understood in this view. There are also sections of completed track (with lengths of unbuilt steel rail on top).
With the track assembled, it was possible to see if the lengths would follow the route I had planned..
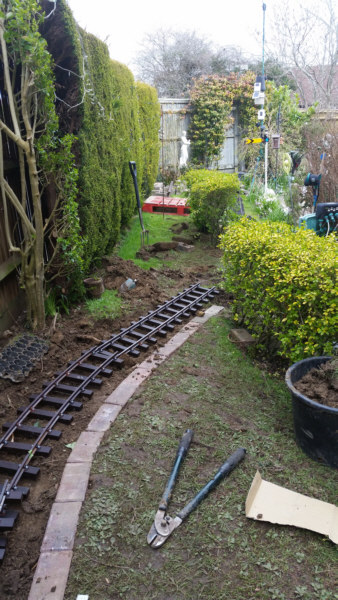
Construction began. Trees had to be cut down and the trackbed carved out. For drainage and track stability, I tried to dig 6" to 8" down. There were places where this was impossible (for example due to roots of loved shrubs and pre-existing cables for the weather station) but also places where the cut was deeper (in order to maintain a final track as near level as possible).
Two more views of soil being dug from the proposed trackbed. The bricks at this stage were only markers and not especially tidy.

At various stages, I'd check the track still fitted. Once bolted together it was rigid and there was little scope for additional bending, either to correct for deviations in the route or gradient.
In view on the left is a blackbird. They had a field day during construction with worms readily available. I think we had five young in the garden that summer. I'm not looking my best on the right, being taken by surprise as I contemplated a deep cutting approaching the fence. This was a real problem as there was a mature Jasmine to the right and a fairly recently planted one to the left. I was keen to avoid cutting through roots and managed to 're-route' some of the roots. Both these shrubs survived without any harm.
The cutting deepens! The blackbird is feasting again.
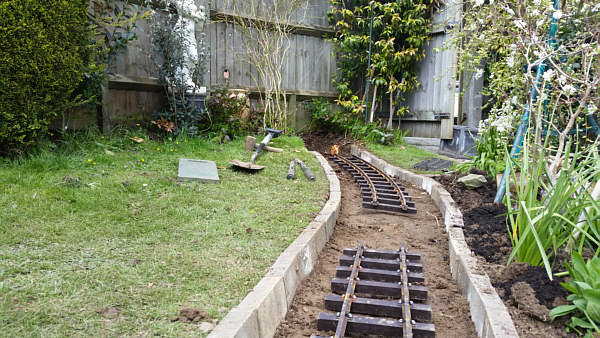
Does the track fit? Yes, just!
Most of the soil has been dug from the site of Blackgang station to be. The fence and advertising hoarding is ready for attaching to the main fence.
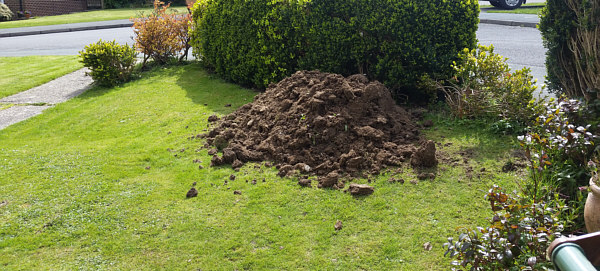
I used most of the soil I extracted to level the grass in a number of places. About 20 wheelbarrow's worth was dumped on the front lawn while I decided what to do with it. There's more here than may appear from the photo!
More track testing to check the fit.
Four of five inches of ballast is laid on top of lining sheets (to prevent weed growth).
Blackgang station takes shape. With all the construction work, the grass is looking the worse for wear but will soon recover.
Two shots of the ballast. One concern I had was would there be a problem when I came to selling the house? Well my wife's reaction at this stage was that the track looked really nice and would make a nice path. That means all I'll need to do should I move is to reclaim the track itself.
Blackgang station with the white picket fence now in position and the ballast laid.

... and the track still fits.
Finally another couple of inches of ballast was added to cover the sleepers (mid-distance). With the final ballast not yet added in the foreground, the lining can be seen to the side of the bricks.
To the left, another shot of the freshly laid lower ballast and to the right, winter storage (showing the wheeled trolley).
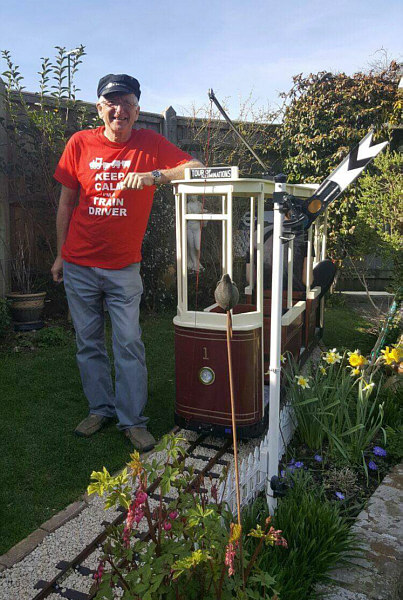
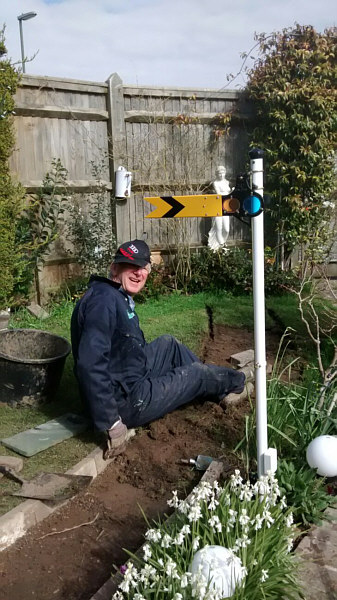
And lastly a picture of me with the tram. Having looked though the photos so far the size of the tram may appear small here. As I said previously, the scale of the tramway can be visually altered by clever camera angles (representing the view at passenger height) and by the use of shrubs to break the view.
Tram for sale
I mentioned above that the tram is sadly too big and heavy for my small garden. Although I have a wheeled cart to transport it on level ground, it is extremely difficult getting to and from the track level and takes at least three adults. For this reason I intend to sell it. If you know of a good home please get in touch. I'm happy to sell it for the cost of the original wooden frame and the cost of the renovation work (which included all the electrics and running gear). There's also a tough made-to-measure canvas type cover to keep it dry (although not suitable for the winter months as condensation would be likely to form under the canvas). This link provides details of the 5 inch gauge garden tram for sale.
Resources
- Southern Nouveau and the Lineside This book contains detailed designs of railway furniture / architecture.
- Vinyl cutter for making bespoke and replica signs.
- Ride on Railways for engines and electrics (they renovated the tram). They can also supply track and signals.
- The Miniature Railway Supply Company (MRSC) for the track used on my railway.
- Scaleway Signals for the signals and some signs used on my railway (associated with MRSC above).
- Station Road Steam another engine builder. I purchased the tram from them, sold as a 'project' although this is not the company's main business.
- Maxitrak supplier of the Planet shunter. They also build steam locos.
- Ghost Train DVD (and possibly Blueray) of the 1941 film.
- Ghost Train script for Arnold Ridley's play, the Ghost Train.
- Clinometer free Android app for measuring gradients.
- Amberley Museum a fantastic museum (lots of transport related exhibits) and where my tickets were printed.
|
|
|
|
| © 2018-19 Dave Parker Email Dave |
|||
from
 websites
Click here for 'ReliableCounters'